A Step-by-Step Tutorial
Hi there! Welcome to Amutri – we’re thrilled to have you on board. Amutri is designed to be intuitive and user-friendly, and we’ve prepared step-by-step instructions to guide you every step of the way. Let’s dive in!
SIGNUP FOR FREE
Getting Access
To begin your journey, you’ll need an invitation to access the 3D Experience. Here’s how to get started:
1
Sign Up Using Your Invitation
Check your email for an invitation link. Click the link to register using the same email address that received the invitation. This ensures everything connects seamlessly. If you run into any issues, we’re here to help!


2
Start the 3D Experience
Once logged in, locate the 3D Experience and click on it. If the 3D Experience isn’t visible, reach out to us, and we’ll ensure your access is properly set up.

3
Hold Tight While It Loads
This might take a couple of minutes. Good things take time, right? (But don’t worry, we’re working hard to make this even faster very soon!)

4
Explore the 3D Experience
Once loaded, you’re ready to dive in. Use your mouse to look around and the WASD keys to move forward, backward, or sideways. Press E to move up, Q to move down, or double-click to travel to that location.

5
Adjust Movement Speed
Customise your navigation pace with the movement speed controller located in the bottom-left corner. Use the plus (+) and minus (-) buttons to increase or decrease your speed, or enter a specific value for precise control.

6
Using Walk mode
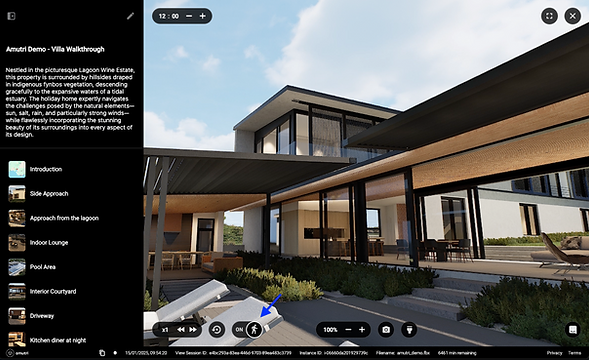
Click on the Walk mode button located in the bottom-left corner to switch from flying to walking through the environment. This feature allows you to simulate a ground-level perspective, making it feel like you're truly exploring the space on foot.

7
Using Zoom
To adjust your view, use the zoom controls at the bottom center of the screen. Click the plus (+) button to zoom in for a closer look or the minus (-) button to zoom out for a wider view.

8
Navigating with Scenes
On the left-hand panel, you’ll find a list of Scenes that provide quick navigation to key locations. Simply click on a Scene to fast travel. If you prefer a cleaner view, you can hide this menu using the button in the top-left corner.


9
Change the Time of Day
Easily set the time of day and adjust the sunlight in your scene using the controller in the top-left corner. Use the plus (+) and minus (-) buttons to change the time incrementally, or enter a specific value for precise control.

10
Taking Screenshots
Capturing stunning visuals is simple with the built-in screenshot feature. Click on the camera icon to take a screenshot, and the system will automatically render a high-quality 4K image. The image is then instantly downloaded to your computer for easy access and sharing.

CUSTOMISE
Editing Your 3D Experience
Personalising your 3D Experience is a great way to make it more powerful. Whether you’re curating scenes, adding descriptions, or fine-tuning the details, here’s how you can take charge of the experience:
1
Customising Titles and Descriptions
Click on the edit button in the left-hand panel to update the title and description. This helps viewers understand the context and purpose of the 3D Experience. By default, the title matches the filename, but you can change it to make it your own.


2
Adding New Scenes
Navigate to a key location in the 3D Experience and click "Add Scene" from the left-hand column to save it. You can give the Scene a title, write a description, upload a slideshow of images, or even links to external websites.


3
Refining Existing Scenes
If you need to modify a scene, use the dropdown menu next to it in the left-hand panel. You can adjust the view, the time of day, update the title and description, and add or remove images to better suit your needs.


SEND INVITES
Sharing the 3D Experience
Collaboration is key, and sharing your 3D Experience is a breeze. Here’s how you can do it:
1
Access Sharing Options
Click on the dropdown menu on the top right of the 3D Experience cover image and select "Manage" to open the sharing settings.

2
Invite Collaborators
You can easily invite others to view or collaborate on your 3D Experience. Use the "Add Host" option to grant full editing permissions via email. This allows them to create and edit scenes, update descriptions, and share the Experience further.


For those who only need to view the content, select "Invite Guests" to provide viewing access without editing capabilities.

